Transformation functions enable you to change an object’s location or scale, and move, copy and rotate objects. All functions allow you to define transformation parameters first and then apply them, or to perform the transformation dynamically. See Dragging Objects.
Translate or Copy 2D Objects– MOV, Ctrl + T |
Moves or copies objects along a defined translation vector. The vector is defined by two points and indicates distance and direction. If objects are to be copied, you can specify the number of copies, and the original object is preserved. Multiple copies are made along a row. You can modify the length of translation, so the original vector defines only a direction.
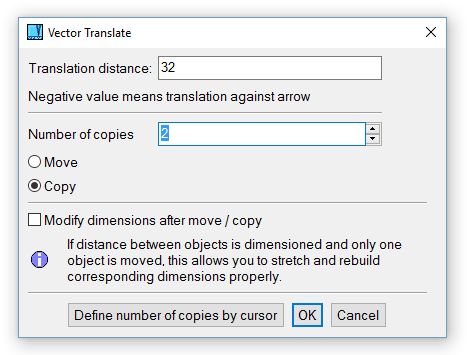
Vector Translate window
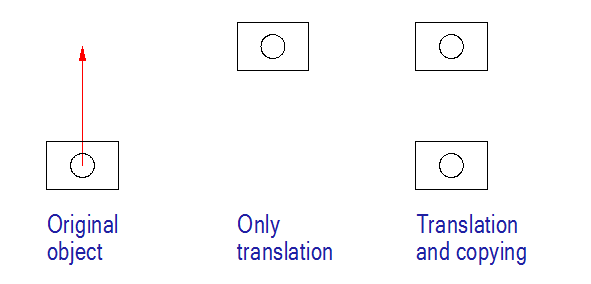
Moving and copying
Dynamic Translation - DRG |
Moves or copies objects, with cursor movement defining the new object locations. Select the objects, define their insertion point, and select new locations of the insertion point. If you choose not to delete the original objects, copies will be made.
Rotate or Copy 2D Objects - ROT |
Rotates objects around a defined point by a specified rotation angle. You can choose to rotate only, or to rotate and copy. If multiple copies are made, each copy is separated by the rotation angle.
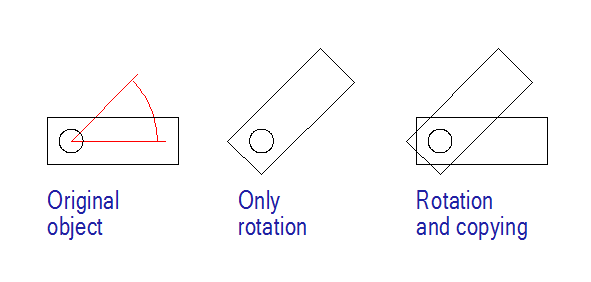
Rotating and copying
Dynamic Rotation - DRO |
Rotates dynamically using the cursor. Select objects, define the center of rotation, and select a reference point. The cursor movement defines the direction from the rotation center to the reference point. You can choose to rotate only, or to rotate and copy.
Translate and Rotate - DTR |
Both moves and rotates objects. Select objects and define the first and second reference points. Then define new locations of both reference points. If you choose not to delete the original objects, copies will be made.
Scale - SCA |
Rescales objects. Select the center of scaling and the scale value. You can choose to scale only, or to scale and copy. If multiple copies are made, the scale value is applied to each copy progressively.
Dynamic Scaling - DSC |
Scales dynamically using the cursor. Select objects, define the center of scaling, and select a reference point. The cursor movement defines the scale value. If you choose not to delete the original objects, copies will be made.
Array Copy - CTA |
Creates an array of copied objects. Define the origin of rows and columns, the direction and distance between columns, and the direction and distance between columns. Then specify the number of copies in rows and columns. This value is the number of new copies; the original object is not included. You can also define the number of copies by using the cursor to select the location of the last objects in rows and columns.
Mirror - MIR |
Creates mirrored objects from selected ones. The mirror axis can be an existing line, or you can define a temporary line by selecting two points. You can choose whether to delete existing objects.
If you select non-isotropic mirroring, the mirrored object will be created on the same side of the mirror axis (in case of positive mirror value), and will be scaled perpendicular to the mirror axis. Non-isotropic mirroring is not possible for dimensions. Non-isotropic mirroring scales objects only in one direction.
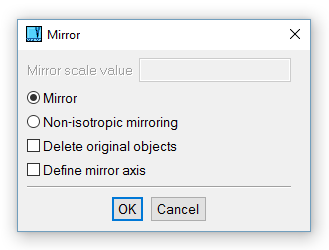
Mirror window
Offset - OFFS |
You can use following methods of offset definition:
Offset copies can be created for single objects, temporarily integrated poly-lines or existing poly-lines.
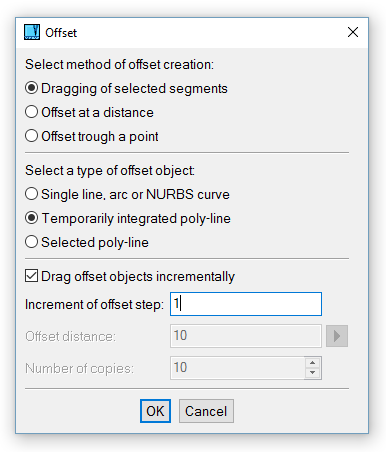
Offset window
Stretch - SOB |
This type of stretching uses the cursor movement to define a new shape of selected linear objects. Use a selection window to encompass the endpoints of line segments you want to move. After selecting objects, select a reference point and move the cursor to stretch the objects. To stretch horizontally or vertically, turn on temporary construction lines (see Temporary Construction Lines ) or use Ortho mode. Then, vertical or horizontal direction is easy to follow.
To start stretching of objects, you can press Ctrl + Shift and move the cursor whenever system waits for a new command. A selection window is started immediately. Select objects and a reference point.
You can select objects in advance. After selection, press and hold Ctrl + Shift while moving cursor. In next step, VariCAD process the pre-selected objects, looking for lines end-points. No other objects are automatically selected from defined rectangle. Next, select the reference point. This way you can exclude some objects which would be otherwise stretched.
If you need to stretch linear dimensions (like horizontal or vertical dimensions), you can select them in advance - by single click or by selection rectangle. Then, create a selection window by pressing Ctrl + Shift and moving the cursor. If you define a selection rectangle and only one dimensioned point is inside, it is automatically considered as the reference point. Or, you have to select a reference point using mode “Nearest dimensioned point” – see Selecting 2D Locations.
Stretch to Direction - DST |
Stretches objects along a defined direction. You can stretch objects horizontally, vertically or by a diagonal vector defined by two points. Define the line dividing the preserved and moved points of objects which will be stretched, select objects and the reference point. Move the cursor to define a new shape. This type of stretching can only be done on lines; other types of objects are moved without being stretched.

|

|

|